note: This topic is intend to provide a comprehensible thoughts and personal opinion regarding pincer joseki. This topic is “inter-connected” with my other topics of :-
1) Basic Joseki 1 (Hoshi-Kakari-Pincer)
2) Joseki 1 (Double Sparrow)
3) Joseki 2 (Double Sparrow)
4) Joseki 3 (Double Sparrow)
Diagram 1, One of the most common joseki to be learned by everyone. Black moving at A is not recommended because the stone move-3 is too near. The reason why not many high level players chose move-3 anymore.


Diagram 2, Black move-3 high pincer is a better choice here compared to B. Black can comes back for A later which does not emit a ‘over-crowded’ of stones as opposed to Diagram 1.
Diagram 3, Black can tenuki. White move-1 to move-9 provide no threat to Black.
Diagram 4, When Black high-pincer move-3, White pincer back at move-4 is a counter-attack. Black to move next: A or B?


Diagram 5, If Black chooses move-5, White is happily to settle at move-10. Black has no good attack against White because Black stone at move-3 is not at A which could not aims B.
Diagram 6, If we moved the stone from B to A. Black has can destroy White with move-1.
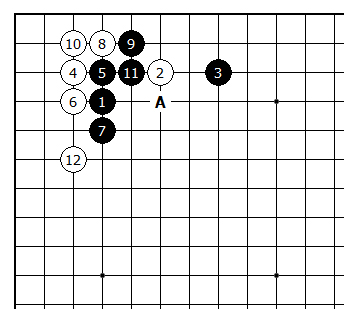
Diagram 7, Now Black move-5 is on the top direction which gives Black a sente at move-11 peeping A. In conclusion, White move-6 trade with move-7 is bad.


Diagram 8, White did not make the exchange shown on Diagram 7. Black A now is not a sente.
Diagram 9, Hence, if Black chooses move-1 to move-7. White is very happy to take the stone move-5 with move-8. Black cannot do anything because A stone is higher as compared to B.
Diagram 10, If B stone has been moved to A. Black can easily save the stone with move-2.


Diagram 11, If Black continues to atari move-1. White has Miai at A and B.
Diagram 12, If Black chose to move-1 tiger-mouth block, White ended up at move-4. Black cannot connect his stone with A as compared to Diagram 13.
Diagram 13, If we moved the stone from B to A. Black can easily connect his group with move-1. and aims for C later.


Diagram 14, take note of Diagram 10 and Diagram 13, Black move-3 low 2-spaces pincer provide good result. White has to pincer at move-4 instead of A to counter-attack.
Diagram 15, White move-14 now is a good sente because Black has to play at B to prevent White’s connection at A. White C later is good development on the left.
Diagram 16. if Black chose move-1 variation, White has to atari move-6. with sente, White will also develop on the left.


Diagram 17, continue from White atari move-10 from Diagram 15. White can choose move-1 tiger-mouth here, and develop the top with move-9. White is happy.
Diagram 18, Black move-1 here is best counter attack against White 1-space high pincer. Black easily settle at move-11 with decent territorial spaces.
